Pages

Wednesday, January 29, 2014

Hump Day Beauty!


HAPPY HUMP DAY! Michele here on this fine Wednesday... This week I would like to share with you a project that was featured over at 3 Girl Jam Saturday!!   Make sure you check out all the pretty ribbons over at their store!!

I created this mixed canvas using 2 ribbons from the 3 Girl Jam store, pink crinkle ribbon and jute ribbon.


Gesso and gold crackle modeling paste are smeared over an UmWow Studio chipboard piece, hexagon background.  My cicada, also from UmWow, is painted with distress paint, gesso and crackle modeling paste and then pinned to the canvas.  I used some Studio Calico wood alphas and a banner which is also pinned to the canvas.


Thanks for stopping by today
and I hope you are inspired to CREATE!!

Saturday, January 25, 2014

Special Ops:Mist, Splatter, Punch Card


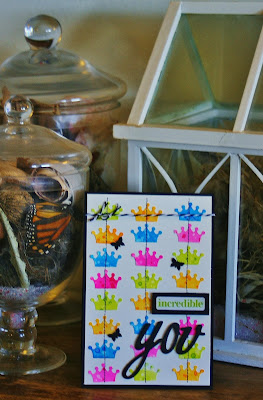
Project:Incredible You
Today's special ops lets you get out that mist and make a BIG mess but still have a tidy project to show for it...the best of both worlds!


The crisp black and white layers of this card make a perfect canvas for these bright shapes. Layers of mist make the shapes truly exceptional. But who has time to mist and splatter and blot all those little crowns? Not you! Follow these easy steps for a one-of-a-kind look, and get it done all at once.


Step 1:
Spray mist on to heavy cardstock, spread mist with paper towel, let dry.


Step 2:
Splatter mist on to cardstock, let dry.
(This will leave vague, medium splotches.)

Step 3:
Splatter another layer of mist onto cardstock, blot with paper towel after 30 seconds, let dry.
(This will leave dark, small splotches.)


Step 4:
Splatter cardstock with water, blot with paper towel after 30 seconds, let dry.
(This will leave bright, white splotches.)

Step 5:
Punch shapes from misted cardstock. Assemble card.


Check my blog Scrappin' Chaos for a list of supplies used.

Scrap on!

~charity~


Wednesday, January 22, 2014

Hump Day !


Hi Bev Code here!


I'm super excited to share a wooden frame that I found. I used gesso to cover the entire frame and gave it a few coats.
Then using stencils and some coloured painted added to yet more gesso. I used a mask to add the fun accents to the board. Because the gesso is so much thicker than the paint the frame has great textured look.


After adding the gesso I decided to let it dry overnight. you shouldn't rush this step.


Here is my finished wooden wall frame... with a great little photo added, lots of fun paper elements, some metal accents and even some gem stones. I also added lots of glossy accents over some of the paper rings and scallop edge to help it adhere it to the frame. 


Up close you can see the glossy look, a 3D flower with a brad and the metal flower and some liquid pearls too. 

Just a few more close ups of all the lots details. 


Thanks for visiting.. 
I enjoyed sharing with you today.

~Bev

Saturday, January 18, 2014

Drill #24 Button up this Sketch!

Drill #24 
Button up this Sketch!

Make sure you button up it's cold out there!  

For this weeks drill we want to see some buttons anywhere any how just dig them out of your stash and add them to your layout based on this weeks sketch brought to you from 
Page Maps.

Requirements: Create a layout using buttons based on this sketch.

***We are only able to ship to the US & Canada

And just for a little Motivation! 
One lucky winner will be randomly selected
 to win this prize pack of embellishments: 


Now before you go take a look at what the  
S.W.A.T Team has created to help you inspire you! 


Venetia


 Lisa


 Claude


Doris

Lanette


Thank you so much for stopping in today.

 Now it's your turn, Button up this drill and link up your layout by January 31st at 11:55PM EST.
***We are only able to ship to the US & Canada


Wednesday, January 15, 2014

Happy Hump Day!!!


Guess what day it is ....

That's right 
** HUMP DAY **
and here at SWAT, we like to showcase a project in the middle of the week to get you over the hump and crafting like crazy until the next project/challenge is posted.


Isn't this too cute???  I just love my boy's very tired looking face!  One of these years the kids will be up later than we will - but until then - we'll wake them up for some Midnight Fun!

Have a great crafty day!


Saturday, January 11, 2014

January Basic Training - Reverse Stenciling

Topic:Reverse Stenciling


Happy Saturday and Happy New Year!!  Thanks for stopping by for our very first basic training of 2014.  Michele here today and I am going to share a technique that can be used on just about ANY project.  I used it on an art journal page for this little demo.


You will need gesso, acrylic paint, sponge or paint brush, baby wipes and stencils.  For this project I started with a page from my art journal.


Cover your surface with a thin coat of gesso.  Let it dry completely.  I am not a patient person so I helped it along with my heat gun but be careful or your gesso will bubble and while I LOVE that technique it cause a bumpy surface and will give you trouble for this technique.
Once your gesso is dry paint on your acrylic paint, I used Distress paint.
While your paint is drying a little take a baby wipe and squeeze out any excess liquid.


Lay your stencil (this is punchinella from Gauche Alchemy) on the paint while it is still a little wet and rub with the wipe.  This removes the paint.


I layered a couple of stencils to create dimension.  This stencil is from UmWow Studios.


After the paint dried completely I wanted even more texture so I used one of the same stencils with some gesso (another of my favorite techniques)


You can layer your paint and layer the different stencils directly on top of each other or spread them around the page...so many options with this but just make sure you let the paint completely dry before you go tot he next layer.

Here is my finished art journal page.


I added stamps from VLVS!, chipboard from UmWow Studios, ribbon from May Arts, washi from Gauche Alchemy, flowers from Prima along with a junkyard finding...you will also notice Tim Holtz filmstrip, paperclip and alphas and Tattered Angels glimmer mists.  Oh, and don't you JUST LOVE vintage Scrabble pieces??!!!

I hope you enjoyed this fun technique and I hope to see it on one of your future projects!  Come back often to play...we have 2 drills every month and your can win fun prizes!

Happy scrappy 2014!

Michele
visit my blog by clicking here :)


Wednesday, January 8, 2014

Happy Hump Day -You Are My Sunshine!


Hi Everyone! Venetia Here, Since we are in a new year of mid-weeks to get through, I thought I'd share a little sunshine with you. For those of you in those horrible temperatures I hope this warms you up just a little.


 I made this art journal page for my oldest, because this was my song for her. Even today, she is my little sunshine, which is so grand to have in the grey Pacific Northwest. She still remembers this song, and when she saw the page, she immediately exclaimed, "You made this for me!" True, but I want to share her sunshine with all of you. Happy 2014, and share your happy thought with us at SWAT by commenting below.

~Venetia

Saturday, January 4, 2014

Drill #23 One WORD for 2014


Drill #23 Resolutions
 Word for 2014!

Its that time of year again, when we all promise to do better. When we swear we are going to get in shape. We know we are going to save more money.... Yes that's right its time to make your resolutions!

Well, I don't know about you but I hate resolutions! I always fall short and then I feel like I have failed and I'm sick of it. So this year I picked one word, just one word to keep me on track and fingers crossed I will.


So that's it I challenge you to pick one word for 2014 and create one project to showcase that word.


*projects can be layouts, Art Journal Pages, Canvas or other Altered Projects.

For this Drill I really want you to be motivated so the winner of this drill will receive a $20 Gift Card to Two Peas in a Bucket.


$20 Gift Card

Now before you leave make sure you take a look at what the S.W.A.T. Team has created to inspire you. I know they worked really hard on these projects and I hope they all achieve their goals for 2014!


Michele's word of the year

Becci's word(s) of the year

Alison's word for the year

Venetia's word of the year


Nicole's word and goals for the upcoming year - A 6x12 insert


Doris' Word of the Year Simplify


Nicolle's word of the year BALANCE

Lanette's Word for 2014 is FOCUS

Lisa's Word for 2014 is Choose

Now its your turn to share your word with us! 
Have fun and link up before the end of the month on the right hand side of the blog, we can't wait to see what you create!

Thanks for stopping by today!!