Saturday, December 28, 2013

Special Ops: Chalkboard Mini Case

SPECIAL OPS!
+
Thanks, Grandma!
There is nothing Grandma loves better than showing off her munchkins. This chalkboard album case lets her do that in style.
The instructions for the chalkboard mini-album can be seen on the Just Imagine Crafts blog.

Supplies:
One Starbucks Via Ready Brew 3-pack envelope
One sheet of black cardstock
24 inches of 3/4" ribbon
3.5" of mini pom-pom trim
9" of twine
2 large brads


Directions:
Step 1: Open the Via envelope at all the seams.
Step 2: Lay flat on black cardstock and trace.
Step 3: Extend top flap by 1/2".
Step 4: Trace a second set of lines 3/8" out from central rectangle.


Step 5: Cut out case.
Step 6: Score edges of central rectangle as well as second set 3/8" out.


Step 7: Line wide ribbon up with the edges of the outside of the case and adhere.
Step 8: Adhere pom-pom trim to edge of short flap.
Step 9: Set one brad 1/2" from center edge of short flap; set second brad 1.5" from center edge of long flap.
Step 10: Fold sides in to make edges of case and adhere long flap to them.
Step 11: Wrap twine around brads to close case.


Check my blog, Scrappin' Chaos for a list of supplies used.

Scrap on!

~charity~

 Remember all Challenges are open 
till the end of the year!!


Wednesday, December 25, 2013

Believe in the Magic!

Hello All Lanette Here!

I wanted to stop in today and wish you a very........


And while you are here I thought I would share a canvas that I created for Scrappy Chic using Pink Paislee's beautiful Snow Village Collection.


Products Used: Pink Paislee- Snow Village Collection Cardstock, Tim Holtz Canvas, Dies & Rock Candy  Paint, Ranger Distress Ink & Melting Pot & Embossing Powder, Copic Markers, Stickles, Maya Road Wood Pices & Rose Trinket, Prima Stamps & Wooden Heart, Mister Hueys Shine, Inka Gold and Misc Twine and Button.


I just love these poinsettias created using Tim's Dies!


I just love to dip paper into my melting pot! I love the way the reindeer turned out!


Thank you so much for stopping by today!

I hope that you have a very Merry Christmas! 

And make sure to share your holiday memories with us and link up with this Months Challenges!


All challenges are open till the end of the year!

Saturday, December 21, 2013

Drill #22 Santa Sketch


Drill#22


Santa Sketch

Santa Claus is coming to town real SOON!! So here at S.W.A.T we thought it would be fun to show Santa some Love!

For this weeks drill we want to see Santa some where in the sketch. He can be in your picture or on your paper... anything really as long as its Santa.

Here is this weeks sketch from brought to you from Page Maps.


And just for a little Ho..Ho... Motivation! One lucky winner will be randomly selected to win this prize pack from S.W.A.T.

***We are only able to ship to the US & Canada


Now before you go take a look at what the  S.W.A.T Team has created to help you inspire you on your merry crafty way!


Doris


(It's not from this weeks sketch but well worth the share!)

Venetia 


Thank you so much for stopping in today.

 Now it's your turn to show Santa some Love!

Just make sure you link up your project by December 31st at 11:59PM EST.

** This month we are giving you a few extra days :)

Thanks for stopping by today!

And don't forget to link up your December Daily Projects!
 
We have lots more prize packs to send out:)

Wednesday, December 18, 2013

Hump day!


Venetia's Year End Top 5 List!

Hi everyone, Venetia here. I love lists. I am such a sucker for lists of anything, and this time of year is a goldmine for year-in-review lists. To help you through your week, I am going to share a list of my favorite projects from this year. Hopefully, you will feel inspired, and I hope you share your top five project of the year in the comments below! Celebrate your creative successes with SWAT by choosing your top five projects of 2013.  

#5 Fall Pomander
 
#4 I am not amused layout


#3 ATCs


#2 Return with Honor Canvas 


#1 Wind Chime


Thanks so much for stopping by today!!!
 
See you Saturday!!
 
Venetia

Saturday, December 14, 2013

BasicTraining

Basic Training
 
Washi Tape for ANY Occasion

I am sure, if you are like me, that you have quite a collection of washi tape.  I mean, who doesn't??  It is the perfect little accent for any project.  Michele here this fine Saturday and even though I have close to 100 rolls in all different colors and patterns sometimes I just don't have exactly what I am looking for.
A very good friend of mine, DeeDee over at VLVS!, did an awesome tutorial on how to make you own washi with just a few supplies that you will definitely have!


You will need double sided tape, (I used Miracle Tape from VLVS!), tissue paper, a stamp and ink.


Cut a piece of tape the length you want your washi.  Leave the paper on the back side of the tape for now.  Then cut a piece of tissue a little larger than your tape.


Stick the tissue onto the tape.


Ink up your stamp and stamp the tissue.  I used a VLVS!, washi lines background.


I wanted a very light pattern for my project but there are so many possibilities...you are only limitied by your imagination.


Carefully tear off the overlapping tissue.


Very subtle on this project.

 
To see the finished project pop over to my blog, let me know what you think...
 
Here are a few photos of other washi tapes I have made. 


You can also use pre-printed tissue...like the pink with white polka dots in my photos above.  All the others are hand stamped.
 
Thanks so much for spending some time with me today!  I hope you are inspired to create and design your very own washi!! 
 
Until next month...Merry Christmas!
&
Don't forget to link up your December Daily Projects!
 
Michele

Wednesday, December 11, 2013

Happy holiday hump day!!!

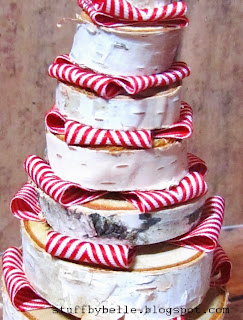
Happy holiday hump day!!!  Michele here to share a quick little piece of holiday home décor.  Christmas is literally right around the corner and if you are like me you are in a mad dash to get all of your holiday projects finished in time for the big day.  I made this tree with only 5 items, birch tree discs, a vintage spool, a Studio Calico heart pin and two May Arts ribbons-red twill chevron and burlap twine.


The hardest thing about this project is deciding if I am going to keep it or give it as a gift.


For more holiday inspiration stop by my blog, stuffbybelle.blogspot.com.  I will look forward to your visit.  Until then, thanks for stopping by today.


Saturday, December 7, 2013

Drill #21 Caroling We Will Go

Drill #21

Caroling We Will Go


For this weeks drill we challenge you to create a project with a Christmas Carol for the title. Any song new or old, fast or slow, any song that makes your heart fill with Christmas cheer!

And just for a little Carol Creating motivation, one lucky winner will be randomly selected to win this prize pack from S.W.A.T.

***We are only able to ship to the US & Canada


Now before you go take a look at what the  S.W.A.T Team has created to get your mojo flowing.


Thank you so much for stopping in today.

 Now it's your turn to spread the cheer!

Just make sure you link up your project by December 31st at 11:59PM EST.
** This month we are giving you a few extra days :)

Thanks for stopping by today!

And don't forget to link up your December Daily Projects!