Saturday, September 28, 2013

Special Ops! Treasure Box!

Michele here today and I am so happy to share a project with you this month for Special Ops!!! 

I altered a book I found all by its lonesome on my book shelf into a box for keep memories of special MOMENTS.

Here it is:


Are you ready to see how I did it??  
OK, here we go!


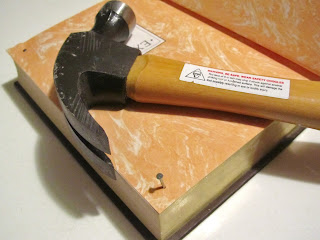
 First you will need a book the size you would like your box to be.   I had a book, as I mentioned, but you could certainly rescue one from your local resale shop.  I nailed the outer corners to hold the pages together when I started cutting.


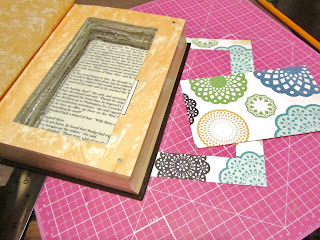
Next measure and mark the opening you will cut out of the pages. Using an craft knife start cutting through the pages until you get down far enough for an opening to collect your treasures.


After you clean out all of the cut pages coat them inside and out with a heavy layer of Mod Podge. Let dry completely.


 Once the Mod Podge dried I selected the paper I wanted to use.  For the inside I measured and cut piece of the paper for the top of the pages and the inside cover, inked the edges and adhered.  I also covered the outside of the book with a piece from the same collection.


Of course now the fun part…embellishing!!   
I did the cover and even a little touch on the inside.


Now your ready to start making those special moments to treasure!!


Thanks for stopping in this week! 

See you next Saturday!

Wednesday, September 25, 2013


Happy Hump Day!
Alison Day here and I'm very excited to be bringing you one of our new Hump Day projects for inspiration.
Today I did a quick art journal page for you. What made it quick, you ask? I already had the back ground done so all it needed were my images and writing.
Here's a look at my process.

Step 1: Create your back ground ... or in my case find one already waiting for you to play with! Yippee!!


Step 2 - Paste on some images.

These were sitting on my desk waiting for me to use somewhere. I must have birthdays on my mind (gee, wonder why?) so today the cupcakes were talking to me. :)

Step 3 - Stamp or write your sentiment. I chose to stamp with black Stazon ink. (Does desert have one 's' or two? I can never remember! LOL!)


Step 4 - Add finishing touches and call it done!

It's perhaps a little hard to see in this picture but I sprayed some Heidi Swapp Gold Lame Color Shine through a polka dot template. Love the shine it gives! Then I took a grey green Gelato to the edges to "dirty" them up a bit. 

And that's it! Have you ever tried art journaling? What's your favourite part of the process? I love the freedom I feel to make a mess! If I get paint or ink or glue somewhere that I hadn't intended I don't worry about it. I just make it work - Tim Gunn style! :)

Have a great day everyone! Oh, and if you're wondering about my cryptic party reference, be sure to visit me on my blog as there may just be one going on over there right now!! :)

Thanks for stopping by see you Saturday!!!

Saturday, September 21, 2013

Drill #16 Tied up in Twine


Drill #16 Sketchy Saturday

Tied up in Twine

It's Saturday and you know what that means... it's time for another great Sketch here at S.W.A.T. This weeks sketch was created by our very own Bev!
 
Now that you have your blueprint here is the twist :) you must use twine(of any kind)on your project.
Remember your project must be newly created for this challenge.
 
Now its time for your inspiration!
Check out what the S.W.A.T. Team has prepared for you today!


Becci  


Doris Widder


Venetia


Lisa Peeples


Claude Campeau


And if that was not enough to get you going! Here's another push, one lucky person will receive a $10 gift card to 3 Scrappy Boys!

 
Now it's your turn to show your stuff! Just make sure you link up your project by September 28th at 11:59PM EST.

Thanks for stopping by today!
 

Wednesday, September 18, 2013

Happy Hump Day!


Happy Hump Day!!

It's Michele here. If you are like me when Wednesday rolls around, I am always looking for some crafty inspiration and since September is half way gone that means Halloween is right around the corner.  I am already starting my Halloween decorations.
Today I hope I will inspire you with a burlap canvas project with an All Hallows Eve theme...


I used some modeling paste on my canvas then inked with my UmWow Studio harlequin mask with Distress Ink-Black Soot.  I just picked up some 7 Gypsies ephemera-Wicked Gypsy at Scrappy Chic, stamped a couple of halloween images from VLVS! with Archival Ink, distressed the edges and adhered to my canvas.  I used my Cameo to cut the swirly pumpkin and added a punch of embellishments.  You may notice May Arts ribbon and jute, Tim Holtz charms and bits, Kaisercraft flowers and washi tape.  Don't you just love the little raven on top?!!


Thanks for stopping by and I hope you have been inspired to create something fun!!!  You can also visit my blog anytime for a little creative inspiration, stuffbybelle.


Thanks for stopping by today!

See you Saturday!!

Saturday, September 14, 2013

Basic Training

Basic Training
 Scrap Flowers 101 

Hello All ! Lanette here I thought I would share a quick tip that will help you save a few bucks!

How you might ask? By making your own flowers from your layout scraps! Yes it can be done here is a layout that I created with some homemade scrap flowers.


So as you can see I used 12 flowers that could caused you over $10 easy! So do I have you attention now? Okay then lets get started.


For the red flowers I used a spellbinders die and
a punch to make the three layers I needed.


Need I creased each petal of the spellbinders flowers.


Layered them,
 I used glossy accents


Next I added a bit of pop to the punched
 flower with my embossing tool. Then add it to the stack.


I used three punched flowers
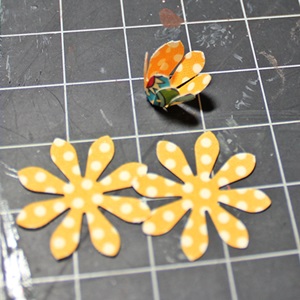
to make the yellow flowers


With the first flower
I folded all of the petals up.


Layered it on the second and attached
with glossy accents and repeat.


 After I added a bit of bling these are the flowers that
I ended up with, made from my scraps
with tools that have been hanging around forever!

I hope you have fun saving some bucks and making your won flowers from scraps!

Thanks for stopping by today!

Make sure you stop in Wednesday for another great

Hump Day Project!


Wednesday, September 11, 2013

Canvas Art!!


Hi everyone! It's Venetia. How fun is it to start your mid-week with some inspiration? I created this mixed media canvas to post over a mirror I have in my office for students. This year, our building is working on common language, and "Be your best self" is one of the expectations that we have outlined for students. My mirror gets a lot of traffic, and students read whatever is near the mirror. I thought that a canvas would be a fun reminder.


To create this, I used one of my favorite techniques, which is using inexpensive items for masks. Right now, masks are hot, and the aisles at my local stores offer many options. I prefer to use masks that are found, or that I create.  For this canvas, I used a mask that I cut from a Silhouette file on a paper from a pad that I knew I wouldn't use. After I cut the file, I used it to add the reddish dots using acrylic paint. I've used this technique on layouts, my favorite being one of my daughter using a plastic canvas. 

Masks are a fun way to incorporate new media, and if it is a technique you want to try, start with something you have on hand. It is a great way to experiment before you add an item to your stash that may not get used.

Remember, to be your best self, and don't be afraid to try out a new technique without all the latest and greatest accessories, I love trying on new ideas, and finding a way to "cheat" allows me to see if they fit before I fill my stash with items that I don't use.


Have a wonderful mid week, and try something new!

~Venetia
 
Thanks for stopping by today see you Saturday!!!


Saturday, September 7, 2013

Drill #15

Drill #15

The Three BIG S's

Its the first Saturday in September and the kids are back to school and summer is its end! Wow that's a lot of S's! Which leads us to this months first Drill #15 The Three BIG S's! For this drill we challenge you to use not just one but all three of these super fun trendy techniques!

1- Stamp It!

2- Stitch It! 
(Machine, Hand or Faux)

3- Spray or Splatter it!

Now that you have your directions here is your inspiration! Check out what the S.W.A.T. Team has prepared for you today!


Alison


Claude Campeau 

And if that not enough to get you going! Here's another push one lucky person will receive a $10 gift card to 3 Scrappy Boys!


Now its your turn to show off your S's! Just make sure you link up your project by September 28th at 11:59PM EST.

Thanks for stopping by today!