Wednesday, October 30, 2013

Caught in My Web!

Happy Hump Day Everyone!

Hello All Doris Here! Each Thursday, I'm up on the Creative Embellishments blog and last week, I shared this layout. I thought it might be nice to share it again here because CE has been the October sponsor for SWAT and contributed a wonderful Halloween themed prize pack for 1 lucky winner! :-D I created my page using a lot of gorgeous Creative Embellishments chipboard and wood pieces. I adore working with their fabulously intricate designs…so much FUN!…and have been amazed by the new designs being added each week! They've been adding new pieces almost every day!

Since I’m backlogged with a few years worth of Halloween pics, I was thrilled to see the variety of titles and designs Nicolle and Mike have been coming up with. On this particular Halloween (2 years ago), I only had the 3 youngest kids with me and Larry was running late at work. He ended up joining us further down the street which was another fun surprise for the kids since they weren’t expecting him to catch up with us. :-D Here’s what I came up with combining the CE designs with a sketch from Purple Pumpkin.


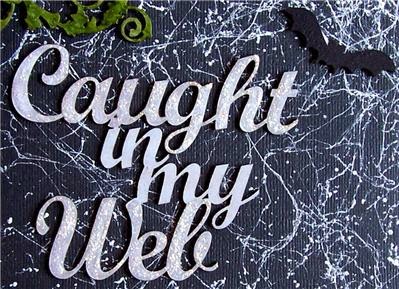
Here’s a close up of the web and spider piece from the Caught in my Web set. I altered it by dabbing it with white distress stain, then coating the web parts with stickles and filling in the spider with a Pitt big brush marker:


I altered the Spider Web Flourish Border the same way, but applied Art Anthology dimensional crystal to the flourishes with a brush. Instead of using a sweeping motion, I created more interest by dabbing it with the tip of the flat brush to create peaks:


Here’s a close up of the cluster I created by snipping a section off of the Web Panel and layering it with wood cuts. I used 2 of the Autumn Leaves and a Pumpkin. I altered the leaves using acrylic paint and the pumpkin using a mixture of acrylic paint and Art Anthology dimensional crystal:


The title piece was altered using distress stain and I applied stickles only to the words Caught and Web. The bats were altered with black acrylic paint which was dabbed on thickly with the side of my brush to give them a bit of texture:


Materials:
American Crafts cardstock
Graphic 45 Happy Haunting patterned paper
Krylon webbing
May Arts trim
cheesecloth from my stash
Tim Holtz distress stain and stickles
Art Anthology Dimensional crystal
acrylic paint
Pitt big brush marker
Tim Holtz die

Thank you for stopping by today!

See you Saturday!


Monday, October 28, 2013

Special Announcement!

Special Announcement!

We hope that you had fun with our FACEBOOK Giveaway, I know we did!

Before we announce our winners we just wanted to say thank you to everyone who took part. We are truly grateful for all the help spreading the word about out our growing site. 

We hope that you will continue to check in often and remember you still have time to enter to win for this amazing prize pack from Creative Embellishments!


You only have a few hours left make sure you link up soon.


Now on to our Facebook winners!


Prize Pack #1  goes to: Entry 14 Lee-Anne Thornton


Prize Pack #2  goes to: Entry 11 Jenessa Frank Franco


Prize Pack #3  goes to: Entry 52 Jean Marmo

Prize Pack #4  goes to: Entry 2 Karen Nofziger


Please contact us @ swatscrappygirl@gmail.com 
by November 5th with your mailing address to claim your prize pack.

Thank you so much again! 
&
Remember to link up your projects soon! 
Today is your last day to enter.


Saturday, October 26, 2013

Special Operations By Bev

While Charity is away Bev offered to share an amazing calendar, so sit back and enjoy your coffee and be ready to be inspired!

Special Ops 
Perpetual Calendar

Bev here to share a Perpetual Calendar .. what a great gift any time for any occasion.. and it last forever. This was one of my favourite projects and am excited to share with you.


So here is week #1 with detailed instructions to make the PERPETUAL CALENDAR. The most important things to remember is to visualize the whole calendar colour scheme you would like when picking all the elements. Whether you go with a monochromatic, soft muted, bright and fun colours.. you need a frame, cover, #'s and month holders. There will be Monthly Cards too but you will get info on them later.


                                                                     **************


So now we will work on part 2 of the Perpetual Calendar... the main frame / stand. I will share two ideas on how to make it because finding a large one piece of heavy card board might be a challenge so I have an alternative to this.


Here is the finished base frame to the Perpetual Calendar. I painted the edges to finish it off. Be sure to stick with it here for the next step to this fun project.

**************

hi.. so are you ready for the next step... the MONTHLY CALENDAR CARDS. They will go inside the Monthly Holders that we made. These Monthly Calendar Cards being made separate would make it so easy to replace some or all of them as you add more celebrations and want to delete some .... the base would be the same just adjust the calendar.. isn't that a cool idea. I started with a hand drawn detail sheet and added the photos of the original sample and then added photos as I made mine. Lots of variations to see and use for ideas.


**************
hi, back again with some finishing touches. You have already done, the frame, front cover, 2 sets of #'s, monthly holder and the monthly cards.
Here is the monthly holders with cards in them finished and decorated.


so 12 months are ready and together. It is suggested that you staple closed very close to the left edge so the card doesn't fall out and leave the right side open to pull out the card and write on it. Here is the photo of the finished project in piles ready to take to be bound together either at a LSS or Staples.


**************

And while I was putting this together I also made another frame using the alternative method with the single pieces of poster paper and reinforced with cardboard to test the stability...
 and it worked out just fine.


I am hoping you can see what i was trying to show you .... the inside was doubled at the flexible seams to reinforce it.


I sure hope you have enjoyed this perpetual calendar tutorial.. and will find time to make them for yourself or as gifts any time of year... thanks for viewing.

ps.. I tested a page and you can print them to save for your quick reference
when your ready to make yours.
 Any one that makes one.. please comment below and leave a link your project
 so I can visit and view it.

-Bev

Wednesday, October 23, 2013

Spooky Greetings!


I know I said this before but it is even truer now...Halloween is right around the corner!!  Michele here today and there are only eight days left, are you panicking?  Well don't, you still have time to get some quick cards done before the ghosts fly by.
Here is a little inspiration for those last minute spooky greetings.


This cute witches hat is a stamp from Viva Las Vegastamps!  I stamped it and colored it with my Distress Markers.  The little bats are UmWow Studio bat confetti that I covered with archival ink.  A little twine and a sentiment flag and viola.  The Oct. 31 is also a VLVS! image.


This flying witch is cut from a Tim Holtz die, Bewitching hour, using black chipboard.  I also used one of the mask techniques from this months basic training, heat embossing with the UmWow Studio star confetti mask.  The full moon stamp is another VLVS! image, add a little jute and a banner flag with a UWS star chip piece heat embossed as well.

See how easy it is?!?!!  I hope you are inspired on this happy hump day to create your own spooktacular Halloween cards!!

Thanks for stopping by!!


Don't forget to hop over to enter to win our 

Facebook Feedback Giveaways


Sunday, October 20, 2013

Facebook Feedback Giveaways!


So what do you think of our new look?


We would love to hear your feedback :)

Please stop by our Facebook Page "LIKE" us and let us know! 

We will be giving away prizes all week!


a Rafflecopter giveaway

*Prizes will vary and will be added after 
every 10 new "LIKES"

*You Must LIKE us on Facebook to win a prize.

Don't forget to join the fun! 

Drill #17 Fussy Cutting

Drill #18 Wild About Wood

Saturday, October 19, 2013

Drill #18 Going Wild About Wood


Drill #18 
Sketchy Saturday
Going Wild About Wood!

The Obstacle: 
You must use wood embellishments.


Guidelines:
*Create a NEW layout as of Oct 19, 2013 –No Back Linking
*Add your entry to our InLinkz box on the left side of the blog to be eligible for the monthly prize.
*Please add a link back to this challenge post when posting your layout on blog/galleries etc. 
*can be combined with other non–sketch challenges.

Now remember This month we are lucky enough to have Creative Embellishments as our sponsor!


Check out what the Design Team did with the sketch today! Makes sure you pay close attention to Doris & Nicole's layouts they are packed full of Creative Embellishments Products!  

Make sure to click on their names below their layouts to head to head to their personal blogs for extra details! 

Creative Embellishments Wood Cuts used on this page: Geek/Chic Glasses. CE laser cut chipboard used on this page: Social Hash TagsBubbly Corner pieces (part of a set), Small Frame from the Together Frame Set, Medium Frame from the You Rock Frame Set, Photo Slide from the View Master set.

Creative Embellishments Wood Cuts used on this page: Hearts and Arrows. CE laser cut chipboard used on this page: Mini Ornate Title/Word FrameCircles panel, Medium frame from the You Rock Frame Set, Medium frame from the Time Flies Frame Set.

Bev


Becci


Deborah


Claude Campeau


Now it's your turn to cut it up! Just make sure you link up your project by October 28th at 11:59PM EST.

Thanks for stopping by today!

One last Thing before you head to your scrappy space.. Did you notice our new look? 

We would love to hear what you think!! So stop by our Facebook Page LIKE US and let us know what you think! We will be randomly rewarding comments all week long!